How to trade Supply & Demand Zones
Demand andSupply Zone, Supply and Demand trading strategies, Supply zone, Demand Zone
Course: [ Top Trading Strategy ]
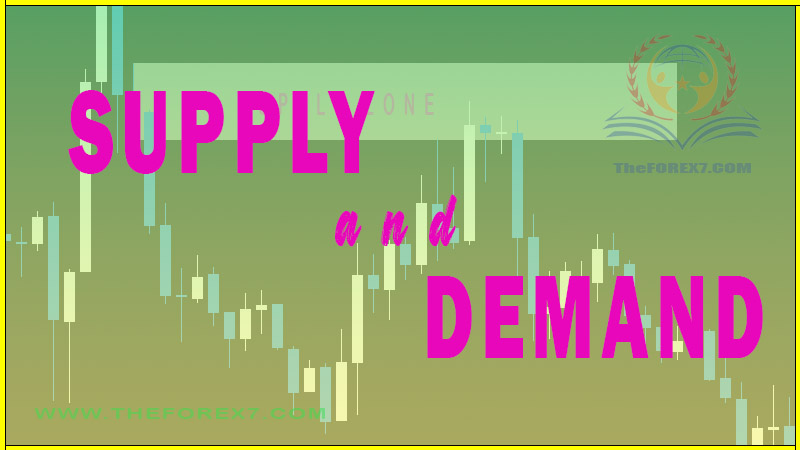
A supply or demand zone can only be seen once the price speeds away from an area on the chart. It indicates there were large institutions (banks) buying/selling interest at the origin of that move.
Supply &
Demand
Supply & Demand Explained
We are conditioned through
education and trading books to buy when the price is high and sell when the
price is low. This is the investment advice instilled in us from an early age, “buy stocks when they are rising, they can only go
higher”.
Yet in every other
aspect of our lives, we buy when something is a bargain and try and sell it for
as high a price as we can get. So why should this be any different in trading?
It shouldn’t, and this is where the professionals differ from the retail crowd.
They buy low and sell high, just as your local car dealership might do. The
pros buy at wholesale prices and sell at retail prices. At this point, a
transfer of funds takes place from novices accounts to the pros. The point at
which this takes place is often what we call a supply or demand zone.
A supply or demand
zone can only be seen once the price speeds away from an area on the chart. It
indicates there were large institutions (banks) buying/selling interest at
the origin of that move. Once this has happened, our job is not to follow the
novice traders and chase the move, but to wait for the price to return to the
zone where we can buy or sell at a “wholesale” price. The charts below show what this looks like
in graphic form.
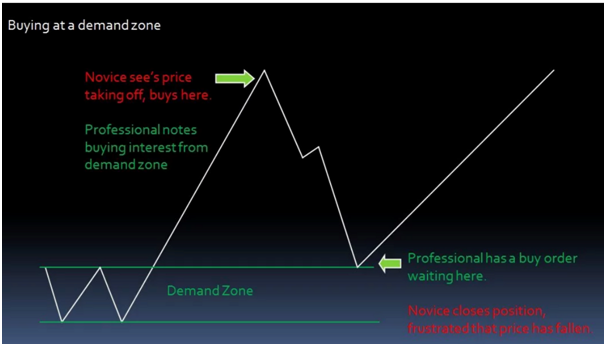
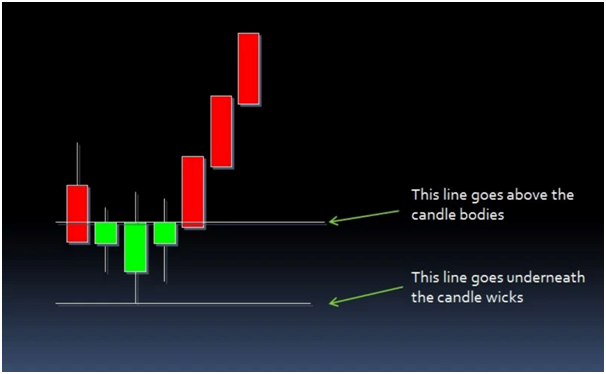
Buying at a Demand Zone
In the images below, the
price was in a consolidation range between the green lines. Price then made a
strong bullish move to the upside. The consolidation is caused by market
efficiency, meaning that there were an equal amount of buyers and sellers at
the same time at that price area. In order for the price to break out of that
consolidation, it would require a HUGE amount of buy orders to tip the scale to
the upside and cause the price to move up. This strong move away from the
consolidation area (basing candles), happens when banks and large investors buy
from these consolidation zones. When this happens, the original consolidation
zone can now be considered a demand zone and the price is likely to return to
that area one more time before continuing. Why? Because bank orders are so huge
that it takes time for the orders to fill, and as they are filling, the price
of the currency is moving up. Because banks want to get all of their orders at
the best price, they often will stop buying once the price moves too far up, allowing
the market to fall back down to the demand zone, and then send the rest of
their orders through. As a professional trader, you will be waiting for that
pullback to the newly formed demand zone and place your orders when the price
returns to that zone, just like the bank does. This way of trading ensures the
highest probability of success since you are often trading in line with the
very people who move the markets.
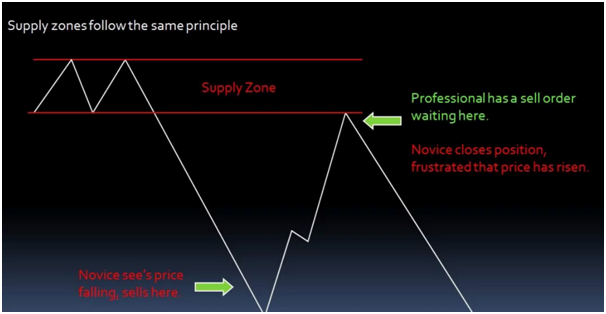
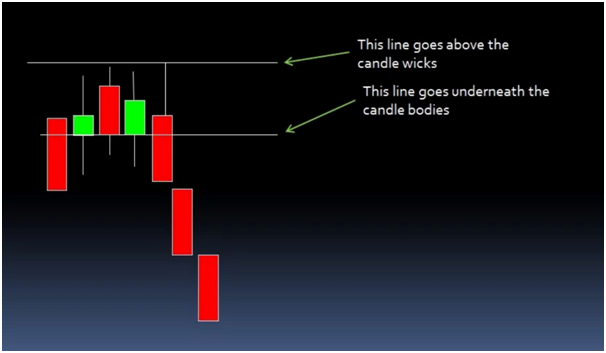
Selling at a
Supply Zone
In the images below, it is a similar situation but in reverse. This time the banks are selling and creating a supply zone instead of buying and creating a demand zone. Price was in a consolidation range between the green lines. Price then made a strong bearish move to the downside. The consolidation is caused by market efficiency, meaning that there were an equal amount of buyers and sellers at the same time at that price area. In order for the price to break out of that consolidation, it would require a HUGE amount of sell orders to tip the scale to the downside and cause the price to move down. This strong move away from the consolidation area (basing candles), happens when banks and large investors sell from these consolidation zones. When this happens, the original consolidation zone can now be considered a supply zone and the price is likely to return to that area one more time before continuing down. Why? Because bank orders are so huge that it takes time for the orders to fill, and as they are filling, the price of the currency is moving up. Because banks want to get all of their orders at the best price, they often will stop selling once the price moves too far down, allow the market to climb back up to the supply zone, and then send the rest of their orders through. As a professional trader, you will be waiting for that pullback to the newly formed supply zone and place your orders when the price returns to that zone, just like the bank does. This way of trading ensures the highest probability of success since you are often trading in line with the very people who move the markets.

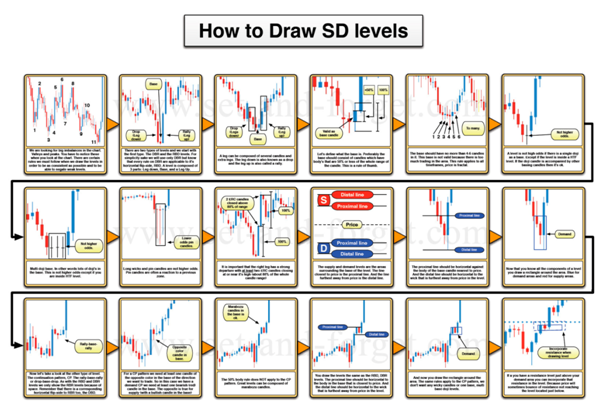
How to Draw
Supply & Demand Zones
Remember, our goal is to
identify where the banks are buying and selling so that we can get in on the
next wave. Drawing our zones allows us to easily identify where they are and
where to place our orders.
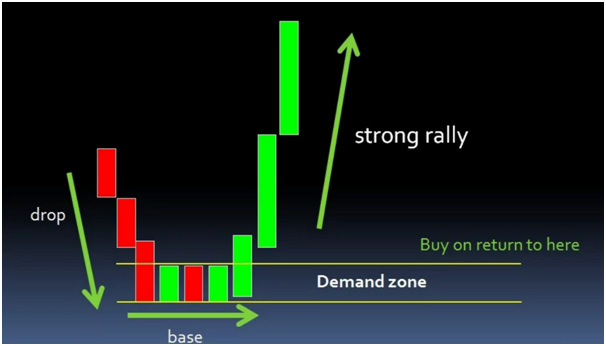
Drawing a
Demand Zone
When drawing a demand zone,
you will draw a rectangle from the top of the basing candles (candles that make
up the consolidation), to the bottom of the lowest wick. Sometimes it is not so
easy and clear, so it is best to draw from the general area where the top of
the candle bodies are to the lowest wick.
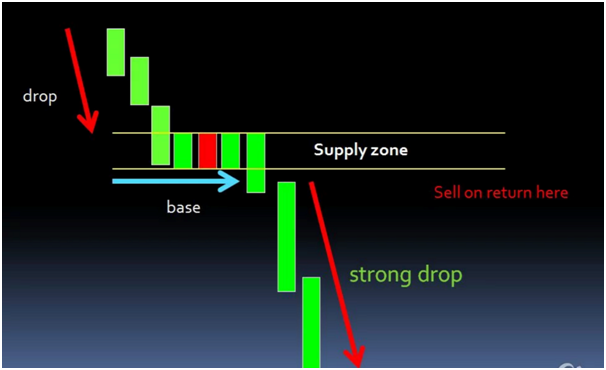
Drawing a
Supply Zone
When drawing a supply zone,
you will draw a rectangle from the bottom of the bodies of the basing candles
(candles that make up the consolidation) to the top of the highest wick. Sometimes
it is not so easy and clear, so it is best to draw from the general area where
the bottom of the candle bodies are to the highest wick.
Top Trading Strategy : Tag: Top Trading Strategy, Forex : Demand andSupply Zone, Supply and Demand trading strategies, Supply zone, Demand Zone - How to trade Supply & Demand Zones